


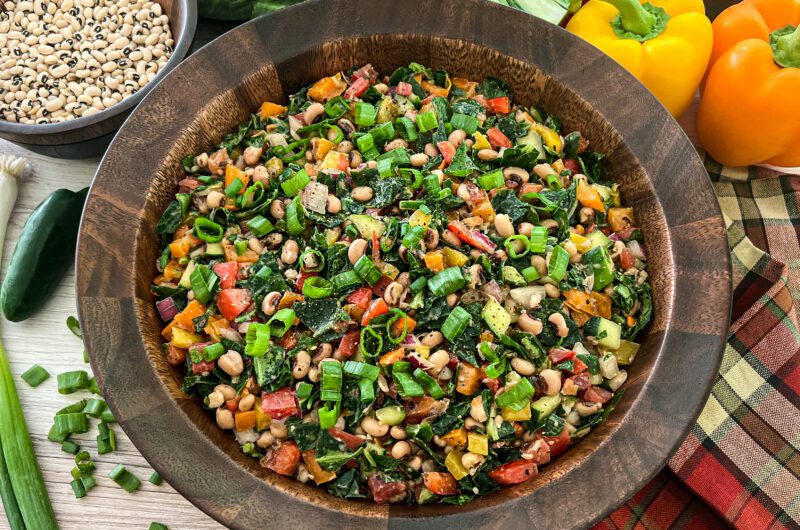
When it comes to salad making, black-eyed peas are among the most underrated ingredients. So, we simply had to add a good black-eyed peas salad to our list of bowl recipes. An indigenous cuisine of West Africa that’s now considered southern “soul food,” black-eyed peas are traditionally prepared with pork, bell peppers, onion, celery and a variety of herbs and spices, and served warm as a hearty side dish.
But, on their own, black-eyed peas are quite filling, unbelievably nutritious and have an earthy flavor and dense, creamy consistency that lends them well to salads. As our founder, Nina, grew up eating black-eyed peas prepared in the traditional way, it didn’t take her long to convert them into a healthier, heartier bowl version – and we’re bringing all the deliciousness to you. In what would ultimately become our “Rainbow Black-Eyed Peas Salad,” That Salad Lady:
- Cooked the black-eyed peas until perfectly tender and then seasoned them with a flavorful blend of dried herbs and spices.
- Combined the black-eyed peas with massaged and marinated raw collard greens for fresh yet traditional southern flavor and more nutrition.
- Added a colorful rainbow of different fresh layers for an even greater nutritional boost.

Tossed with That Salad Lady’s “Classic Balsamic Vinaigrette Dressing” this salad bowl is one of our signature blends. Besides being 100% vegan it’s also gluten-free, simple to make and you won’t believe how tasty and satisfying it is! Even if you’re normally not a fan of black-eyed peas, this recipe will surely convert you.
THE BALANCING ACT
Depending on your eating style, you might initially be turned off by the high amount of carbohydrates per serving of this particular salad bowl recipe (see recipe card). This is mainly due to the black-eyed peas, which are naturally high in starch. Starchy foods have long been an enemy of carb counters and weight-loss seekers as they tend to drive up total carb and calorie counts. But all starches aren’t created equal.
For instance, the starch housed in black-eyed peas is slow-burning starch. This basically means it’s “slowly” digested in a way that helps reduce spikes in blood sugar levels. Black-eyed peas are also chock-full of plant-based protein and loaded with vitamins and minerals including iron, which is vital to the proper function of hemoglobin, a protein needed to transport oxygen in the blood.

When all’s said and done, including black-eyed peas in your diet is a great health move, as regularly eating them helps improve digestion, reduces inflammation and supports healthy blood pressure, blood sugar and cholesterol levels. As with many whole foods, the key to eating black-eyed peas lies in portion control. Below we suggest sensible portions of black-eyed peas. It’ll be just enough to complement the savory flavors of all the other ingredients in the bowl.
Now, let’s talk more about what’s in our black-eyed peas salad and why.
A Dynamic “Soul Food” Duo
In addition to black-eyed peas, our recipe includes raw collard greens. Both our classic soul food staples and often served together.

Despite their name, black-eyed peas are actually beans, not peas. Also called “cowpeas,” black-eyed peas are a type of legume that’s widely available in canned and dried varieties. The recipe calls for cooking dried black-eyed peas. However, you can also use canned black-eyed peas for convenience’s sake.
Aside from the sodium used in canning, there are no major nutritional differences between canned and dried. If you do decide to go the canned route, just choose a brand that’s low in sodium or free of added sodium – organic too if you can spring for it.

Then there are the collard greens, which are by far among the healthiest leafy greens you can put in your bowl. A first-cousin to kale, collards are packed with fiber, antioxidants and a laundry list of vitamins and minerals, including vitamin K, an often overlooked yet very important fat-soluble vitamin that greatly supports heart and bone health.
Below we lay out instructions for massaging and marinating the raw collards in the balsamic vinaigrette dressing included in the recipe. These two simple steps will give the raw collards a softer texture and milder, less smoky flavor, making them more pleasing to the palate. You can also use massaged kale instead of collards to cut down on prep time.
Fresh Colorful Layers Galore
Take a glance at the ingredients list and you’ll see that there’s a colorful array of non-starchy vegetables included. From bell peppers, carrots and cucumber to onions (red and green) and jalapeño pepper, all these veggies bring their own special layer of flavor, texture and nutrition to the bowl. They’re also among the lowest in calories, carbs and sugar so you can add as much of them as you’d like (study up in our Nutrition Glossary to learn all about non-starchy veggies).

We also include plenty of sweet and tangy tomato. Aside from the rich flavor this berry brings to the bowl, it’s full of vitamin C and other health-promoting nutrients. Our recipe calls for Roma tomatoes. They have a dense, somewhat meaty texture that really complements all the other fresh layers in the bowl. You can use vine or grape tomatoes too – and they’re equally nutritious.
Balsamic Vinaigrette for the Finish
The pleasantly savory flavor of That Salad Lady’s balsamic vinaigrette dressing brings out the best in this bowl recipe. A combination of quality balsamic vinegar balanced by the rich, fruity flavors of extra-virgin olive oil, maple syrup and other ingredients, this dressing delivers restaurant-quality taste and a hefty dose of nutrition – and it’s on your salad in just five minutes.

START MIXING
We recommend mixing the dressing first since you’ll be using it to massage and marinate the collard greens. That Salad Lady’s balsamic vinaigrette dressing is included as part of the recipe (see recipe card). To make the dressing, all you’ll need to do is add all the ingredients to your blender or food processor. With variable speed units, start with a low speed and then gradually increase it to a higher speed until the mixture is perfectly smooth. That’s it!

If you don’t have a blender or a food processor, no sweat! Simply add all the ingredients to a jar with a twist off lid and shake it until everything’s well-mixed. You can also whisk the ingredients in a bowl if that’s easier.
GET YOUR CHOP ON
Aside from the black-eyed peas, this salad bowl is prepared much like a traditional chopped salad. You’ll just need a cutting board or another stable cutting surface, and a good quality chef’s knife or another sharp knife suitable for chopping.
Start With the Collards
We suggest chopping the collard greens first, as their preparation time takes much longer than all the other ingredients. You’ll need to marinate them for at least an hour or two – overnight for maximum deliciousness.
Due to their large leaves and texture, you’ll have to de-stem the collards and then chop them into bite-sized pieces. You can use pre-packaged collards to cut down on prep time, but you may still need to chop them further. From here, give the collards a nice, thorough rinse in warm water, massaging them well as you rinse them. Drain the rinsed collards in a colander or use a salad spinner if you have one.

Once you’ve completely drained the collards, transfer them to a large bowl (ideally one with a lid), coat them with at least half the balsamic vinaigrette you’ve prepared and a little sprinkle of sea salt, and then toss and massage them by hand (you can wear disposable food prep gloves if you wish).

After the massage, it’s time to start the marinating process. Simply cover the bowl with a lid or wrap it tightly with plastic wrap and place it your fridge. Again, we recommend marinated the collards for an hour or two, but you can certainly do this overnight – we encourage it. Check out That Salad Lady’s recipe to learn more about preparing raw collard greens for salads.
Chop Up Everything Else
As the collards are marinating (or the next day), chop up the rest of the fresh ingredients. We suggest first chopping the bell peppers, carrots, cucumber and red onion. From there, simply combine them in a bowl and let the mixture chill in the fridge until you’re actually ready to build your bowl – you can even store this overnight. Tomato, green onion and jalapeño taste better when freshly cut so chop those up just prior to serving the salad.

If you plan on cooking the black-eyed peas (see instructions below), you can also chop up these ingredients while they cook.
GET COOKING
If you’re building your bowl with dried black-eyed peas, this is the only ingredient that requires cooking. Our recipe includes instructions for cooking them on your stovetop (see recipe card). While you can soak the black-eyed peas in advance, this isn’t a necessary step. Unlike other dried beans, they cook fairly quickly on the stove. As our recipe calls for cooking them in water, without meat or other ingredients, they’ll be done in about 30-40 minutes.

You can also pressure cook the black-eyed peas using a standard pressure cooker or an Instant Pot. Depending on your unit, pressure cooking takes about 10-15 minutes. We should mention, however, that this bowl recipe is best when they are cooked to al dente. This essentially means cooking them to the point that they’re slightly soft and chewy but still firm when you bite into them.
Achieving this texture is difficult if you’re unable to keep an eye on the black-eyed peas. You want to be able to taste them periodically to ensure the texture is right. Black-eyed peas can quickly turn to mush so keep this in mind when choosing your cooking method.

Whether you boil or pressure cook the black-eyed peas, as soon as they reach the point of al dente, transfer them to a colander to drain, run it under cold water and then transfer them to a bowl. At this point you can season the black-eyed peas with herbs and spices (see recipe card) and let them chill in the fridge until you’re ready to build your bowl.
If you’re using canned black-eyed peas, simply rinse and drain them well, add the herbs and spices and let them chill in the fridge. Rinsing and draining canned black-eyed peas substantially reduces the amount of sodium in them.
BUILD YOUR SALAD BOWL
When you’re ready to build your bowl, combine the black-eyed peas and marinated collards with the chilled mix, add a drizzle of the prepared balsamic vinaigrette to taste and then stir everything together for a nice, even distribution of colors. If time isn’t an issue, you can let the mixture chill in the fridge for 30 minutes or so before eating or serving it. This gives the flavors time to come together.

At this point, you can chop the tomatoes into bite-sized pieces, thinly slice the green onions and finely dice the jalapeño pepper. When you’re ready to eat or serve the salad, stir in the tomatoes, green onions and jalapeño pepper along with more dressing if needed.

All put together, this black-eyed peas salad makes about eight dinner-sized portions. You can use it as a main course, to round out a meal as a side dish or even as a hearty and savory dip. Our founder, Nina, typically eats 2-3 servings in a portion along with added protein (see “finishing touches” below), as she generally eats one large meal a day.
In an airtight sealed container, leftovers will keep in the fridge for 2-3 days. Any leftover dressing will keep for up to 10 days.
Add Your Finishing Touches
To boost the protein content and overall filling effect of your salad, toss in proteins like cooked shrimp, salmon or tuna or even roasted extra-firm tofu to keep the bowl 100% vegan. Visit our Nutrition Glossary for more ideas, as it’s all about making YOU confident in building YOUR bowl.
SHOW US YOUR BOWL
That Salad Lady wants to see your bowl! If you like it, which we are sure you will, drop a comment below and tag pics on Instagram with @thatsaladlady, #thatsaladlady and #buildyourbowl. If you love it, pin it on Pinterest and share it on Facebook and Twitter using #thatsaladlady.
Rainbow Black-Eyed Peas Salad with Fresh Collards
8
servings25
minutes30
minutes400
kcal55
minutesCombining two classic soul food staples and a rainbow of fresh layers, this black-eyed peas salad is bursting with flavor and nutrients.
Ingredients
- Base Salad Blend
1 pound dried black-eyed peas**
1 pound fresh collard greens (kale works too), finely chopped (about 6 cups)***
1 red pepper, cored, sliced and chopped into bite-sized pieces
1 orange pepper, cored, sliced and chopped into bite-sized pieces
1 yellow pepper, cored, sliced and chopped into bite-sized pieces
1 medium cucumber with skin, seeded, sliced and chopped into bite-sized cubes
2 medium carrots, chopped or shredded
1/2 red onion, sliced and chopped or diced
2 Roma tomatoes (vine or grape tomatoes also work), seeded and chopped into bite-sized pieces
4-6 green onions (scallions) with tops and bulbs, thinly sliced
1-2 jalapeno peppers, finely diced
1 teaspoon dried oregano
1 teaspoon paprika
1 teaspoon onion powder
1 teaspoon garlic powder
1/4-1/2 teaspoon cayenne pepper, optional
Salt and freshly ground pepper, to taste
- Balsamic Vinaigrette Dressing
1/2 cup extra-virgin olive oil
1/4 cup balsamic vinegar
2 tablespoons pure maple syrup
1 tablespoon Dijon-style grainy mustard
2 cloves of fresh garlic, minced or whole
1 teaspoon dried or 1 tablespoon fresh basil
Salt and freshly ground pepper, to taste
Directions
- Prepare the Dressing
- As per the recipe, add all the dressing ingredients to your blender or food processor. With variable speed units, start with a low speed and then gradually increase it to a higher speed until the mixture is perfectly smooth.
- If you don’t have a blender or a food processor, simply add all the ingredients to a jar with a twist off lid or even a bowl and just shake or whisk until everything’s well-mixed.
- Marinate the Greens
- Thoroughly rinse the collard greens in warm water, massaging them well as you rinse. Drain the collards in a colander or use a salad spinner if you have one.
- In a large bowl, coat the collards with half the dressing and a little sprinkle of sea salt, and then toss and massage them by hand until they start to break down, soften and shrink (about 2-3 minutes). You can wear disposable food prep gloves if you wish, but using your hands is much more efficient.
- Cover the bowl of collards, store them in your fridge and let them marinate for 1-2 hours, you can even do this overnight.
- Massaging and marinating collards this way softens the greens and reduces their volume in much the same way that cooking them would (see our recipe for more details on how to prepare raw collards for salad making).
- Cook the Black-Eyed Peas
- If you’re building your bowl with dried black-eyed peas (see notes section), start by rinsing them in a colander, discarding any discolored peas or small pebbles present.
- Bring a saucepan filled with 6-8 cups of water to a boil and add the black-eyed peas.
- Reduce the heat to a simmer and cook the black-eyed peas to al dente. This essentially means cooking them to the point that they’re slightly soft and chewy but still firm when you bite into them. Depending on the type of stove you use (gas, electric or induction), this will take about 30-40 minutes (or slightly longer). At the 30-minute mark, taste a bean or two to see if the texture is to your liking and continue to cook as needed.
- Transfer the black-eyed peas to a colander to drain, run it under cold water and then transfer them to a bowl.
- Season the black-eyed peas with the dried seasonings (except for salt and pepper) and let them chill in the fridge until you’re ready to build your bowl.
- Build the Salad
- Combine the black-eyed peas and marinated collards with the chilled mix, add a drizzle of dressing to taste and then stir everything together for a nice, even distribution of colors.
- If time isn’t an issue, you can let the mixture chill in the fridge for 30 minutes or so before eating or serving it. This gives the flavors time to come together.
- When you’re ready to eat or serve the salad, stir in the tomatoes, green onions and jalapeño pepper along with more dressing if needed.
- Add salt and pepper to taste.
- You can enjoy this black-eyed peas salad as a main course, with a meal as a side dish or even as a hearty and savory dip.
Recipe Video
Notes
- *Total cooking time includes the time it takes to prep all the ingredients in addition to the actual time it takes to cook the black-eyed peas on a stovetop. This time does not include the additional sitting time needed for the collard greens to marinate. The longer you let the collards marinate (up to 24 hours), the softer and more flavorful they will be.
- **Our recipe calls for cooking the black-eyed peas on a stovetop. While you can soak them in advance, this isn’t a necessary step. Unlike other dried beans, black-eyed peas cook fairly quickly on the stove. You can also pressure cook the black-eyed peas using a standard pressure cooker or an Instant Pot (refer to the recipe blog for more details on both cooking methods). For a “no-cook” recipe you can use canned black-eyed peas. Aside from the sodium used in canning, there are no major nutritional differences between canned and dried chickpeas. Just choose a brand that’s low in sodium or free of added sodium – organic too if you can spring for it.
- ***You can use an equal amount of pre-packaged collards to cut down on prep time. You can also substitute the collards for an equal amount of kale. Kale is a great alternative if you’re looking to build your bowl in accordance with the actual total cooking time noted above – and it’s just as flavorful as collards. If you do decide to go with kale, just be sure to give it a good massage before using it (see our recipe to learn how).
- To boost the protein content and overall filling effect of your salad, toss in proteins like cooked shrimp, salmon or tuna or even roasted extra-firm tofu to keep the bowl 100% vegan.
- In an airtight sealed container, leftovers will keep in the fridge for 2-3 days. Any leftover dressing will keep for up to 10 days.
This information is provided as a courtesy and is only an estimate. Please review our full disclaimer to get a clear understanding of the nutrition and health information and resources presented and written on our website.


