


Here at That Salad Lady, we’re all about making salad prep easier and more fun – and you’re certainly not limited to the salad bowl. As you’ve probably already seen by now, mason jar salad recipes have taken over the internet, and for good reason. Besides being super easy and fun to make, they’re a great way to keep all your salad layers nice and fresh until you’re ready to enjoy them.
As with any bowl recipe, mason jar salads do require some initial prep work, but the process itself is very simple and straightforward. Just prep your ingredients and dressing, as you’d do anyway, and then add these layers to the jar. To show you exactly how it’s done, we’ve used That Salad Lady’s “Ultimate Salad Bowl” recipe to create a quick and easy “Mason Jar Pasta Salad” that’s packed with fresh veggies, fruits, good fats and protein.

This one’s bursting with flavor, unbelievably filling and guaranteed to be liked by all. That’s a really bold statement but we stand by it!
THE BALANCING ACT
Building a mason jar salad isn’t just about adding a bunch of random ingredients to a jar. To craft the perfect balance of flavors, you’ll need to choose good quality ingredients that go well together. You’ll also need to give some initial thought to your layering system. There’s nothing worse than having a jar full of soggy salad ingredients because you placed some leafy green veggies too close to the dressing.
Here, we’ll show you how to get it all right. Don’t worry, it’s not that hard! Though we’re using the Ultimate Salad Bowl recipe, we don’t necessarily want you to treat it like a “recipe.” Instead, treat it like a simple guide you can use to build your own mason jar salad recipes. You’ll learn how to incorporate the ingredients you like, and pack them in a way that keeps everything as fresh as possible. It’s all about layering your jars in YOUR own way.

So, what’s in our Mason Jar Pasta Salad recipe and why?
Fresh Veggies Galore
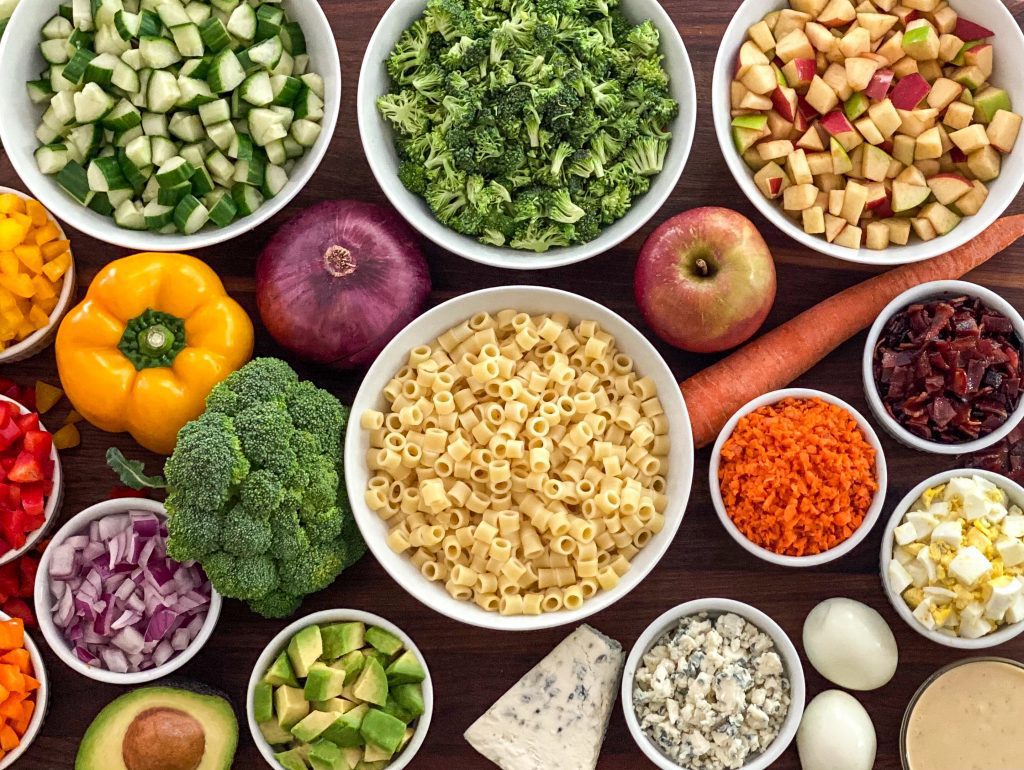
Take a quick glance at the ingredients list and you’ll see there are lots of non-starchy vegetables included. We specifically chose a colorful array of bell peppers, red onion, broccoli, carrot and cucumber, but feel free to choose whichever types of veggies you like. This includes leafy greens and starchy veggies too! All vegetables bring their own special layer of nutrition to the jar so pack plenty of them in there.
The Perfect Fruit Combo
In addition to veggies, our blend includes a deliciously tart and sweet combo of Granny Smith and Fuji apples. We also include the creamy, buttery flavor of avocado fruit, which supplies a hefty dose of heart-healthy monounsaturated fat. Together, the versatile flavors of these fruits help balance out the bitterness of certain vegetable layers like broccoli. It’s no wonder, our Mason Jar Pasta Salad is extremely popular with kids and teens.
Good Quality Protein
Whether you follow a vegan, vegetarian or plant-forward diet, or you’re a meat-lover through and through, That Salad Lady always recommends adding at least one good-quality protein source to your jar. We suggest using shrimp (or chicken if you’re allergic to shellfish), egg, Gorgonzola cheese and bacon bits, but there are tons of other protein layers you can choose. Visit our Nutrition Glossary so you can confidently choose the best protein for you.
Yummy Pasta of Course
We include ditalini pasta in our recipe, as it brings nutty flavor and great texture to the blend. If you’re watching your weight or carb intake, you’re probably already pondering ways to substitute it. Lucky for you, low-carb pasta options are widely available so experiment with the different varieties and see what you like. The key to eating pasta lies in portion control. The problem with pasta is often not the pasta itself – it’s the fact that people eat too much of it.
If you’re following a particular diet you may choose to leave out the pasta altogether. Not a problem at all. You’ll still have a great eating experience with a pasta-free salad. But if your diet is more all-inclusive, by all means, give it a try!
Rich and Creamy Dressing
We suggest using That Salad Lady’s honey mustard dressing. Richly flavored with whole-food ingredients, this dressing delivers the perfect balance of creamy, tangy, sweet and savory to elevate the taste and nutritional profile of the blend. You can also make a quick and easy dressing by whisking some extra-virgin olive oil with honey and fresh orange and lemon juices. This simple combination of ingredients can really bring out the salad’s natural flavors.

GET COOKING
If you choose to make our Mason Jar Pasta Salad as is, some cooking is required for the: (1) egg, (2) bacon, (3) shrimp and (4) pasta.
The recipe includes hard-boiled eggs in whole form – that’s with the yolks. Despite the constant shunning of yolks, they’re a very healthy inclusion to a well-balanced diet (as always, visit our Nutrition Glossary to learn why). Egg yolks also add immense flavor to salads. If you choose to add egg as a layer, our hard-boiled eggs recipe is included (see recipe card).
Bacon also makes a great flavor enhancer that brings in good texture too. That Salad Lady generally uses turkey bacon as the additional salt enhances the flavor. Feel free to use whichever type of bacon you prefer. It’s YOUR bowl. We include our recipe for homemade bacon bits if you choose to use them.
Then there’s shrimp, which adds a huge dose of high-quality protein to the blend. If you opt for shrimp, you can either cook your own on the stove (see recipe card) or, for convenience’s sake, use precooked shrimp.
And, of course, there’s the pasta, which you can simply cook until al dente according to the packet instructions. This essentially means cooking it to the point that it’s slightly chewy but still firm when you bite into it. Pasta boiled al dente makes the starch more easily digestible, which helps prevent blood sugar spikes (see recipe card).
GET YOUR CHOP ON
Our Mason Jar Pasta Salad recipe calls for chopping all the vegetables (except for the carrot) and fruit ingredients into bite-sized pieces. We suggest using either grated or shredded carrots. You can make these with either a flat or box grater, or a food processor. You can also use the matchstick carrots sold prepackaged at your local grocery store.
We suggest chopping everything but the avocado in one take, as avocado just tastes (and looks) better when it’s freshly cut. Needless to say, this’ll be the most time-consuming step. It’s okay. It’s good practice! Just use a high-quality chef’s knife, as it’s designed to make the process of chopping veggies and fruits an absolute breeze.

Once all your veggies and fruit ingredients are chopped up it’s best to keep them separated until you’re actually ready to pack your jar.
PACK YOUR JAR
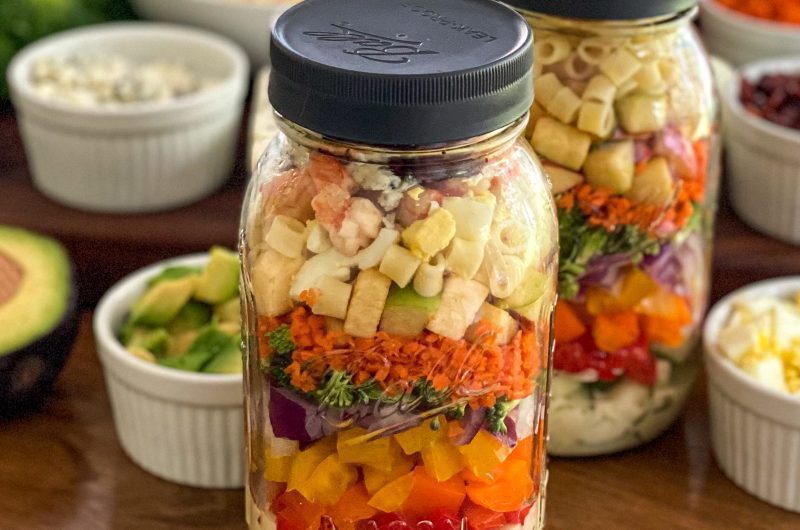
Once all the cooked and fresh ingredients are prepared it’s time to pack your jar. Since things can get a little tricky here, below we’ve laid out layer by layer steps – from the bottom to the top – to make it easy for you (watch the videos to see exactly how it’s done).
Layer 1: The Dressing
We include the full recipe for That Salad Lady’s honey mustard dressing if you want to make it. Whether honey mustard dressing or another kind, we ALWAYS recommend adding your dressing as the first layer. This is especially important if you’re planning to store multiple jars to eat over the course of multiple days. By adding your dressing in any other order you’ll run the risk of a soggy salad – and no one wants one of those.
The only real alternative is building your jar without dressing and then adding it when you’re actually ready to eat it.
Layer 2: The Heavy Stuff
We suggest packing all your heavier or harder ingredients at the base, closest to the dressing. These would be those firm, non-absorbent ingredients that can withstand a lot of moisture like the cucumber, peppers and onion in our recipe. This could also include ingredients like cabbage, asparagus and carrot. Consider the second-layer ingredients as your protective layers that help keep all your other layers separate and dressing-free until you’re ready to eat.
Layer 3: The Hit-or-Miss Ingredients
Once you have your protective layers in place, you can then add what we call “hit-or-miss” ingredients. These are the ingredients that can take on a little moisture should their “protection” fail. For our recipe this includes the broccoli, carrot (only because we suggest grated or shredded carrot), apples and pasta. Other third-layer ingredients could include things like mushrooms, squash, olives and any grains, beans or pasta.
Layer 4: The Protein Point
At this point, you’re moving up into the more delicate ingredients. Along with the fifth-layer ingredients (see below), this is the stuff that can make a really good salad become soggy, slimy, sticky, smelly and sloppy when it sits for too long. The cheese along with all the cooked ingredients (shrimp or chicken, egg and bacon) in our recipe would go here – basically all your proteins, whether they’re animal-based or plant-based (this includes tofu and quinoa).
If you’re eating your salad the same day you make it, or even the following day, go ahead and add these ingredients to the jar. Otherwise, we suggest saving them all until the day you’re actually planning to eat.
Layer 5: The Light Stuff
Finally, there’s all the light stuff. This includes more delicate and/or soft-textured ingredients like the avocado in our recipe along with strawberries, tomato and loose-leaf green veggies like spinach, arugula and romaine in addition to most types of dried fruit. Fifth-layer ingredients also include firmer but dry ingredients that don’t usually fare well in moisture like our beloved nuts and seeds.
Similar to proteins (fourth-layer ingredients), if you’re eating your salad the same day (and ONLY the same day), go ahead and add these ingredients to the jar. Otherwise, we suggest saving them all until the day you’re planning to eat. You’ll thank us later.
Once your jar is all packed, simply seal it tight and store it in the fridge until you’re ready to eat. When it’s time to eat, just open your jar and shake everything out into a bowl or onto a plate. It’s nice because the dressing will land directly on top of your salad. Still, mix the ingredients around with a fork to get a nice even distribution of dressing on your salad.

The Versatility of Mason Jar Salads
Mason jar salads offer endless possibilities for meal prep. Whether you go with our Mason Jar Pasta Salad or another recipe, the layering system we’ve put together here will help you easily create spectacular salads that are both tasty and nutrient packed. Just get your salad prepped, pack and seal your jar tight and store it in the fridge until you’re ready to eat.
Of course, the number of salads you can prep is determined by the size of your mason jar. Depending on your eating style you can use either a 16-ounce or 32-ounce jar.
All put together, our recipe is large enough to fill up to 10 standard 16-ounce jars so feel free to share the love. Our founder, Nina, generally packs up about five 32-ounce jars, which she eats over the course of a workweek. With proper layering and storage, most mason jar salads will keep in the fridge for up to five days. Just make sure your lids are always kept tightly sealed
SHOW US YOUR WORK
That Salad Lady wants to see all your great work. If you enjoy our Mason Jar Pasta Salad or even use our layering system to craft your own recipe, drop a comment below and tag pics on Instagram with @thatsaladlady, #thatsaladlady and #buildyourbowl. If you love it, pin it on Pinterest and share it on Facebook and Twitter using #thatsaladlady.
Mason Jar Pasta Salad Recipe
10
servings30
minutes20
minutes460
kcal50
minutesBursting with flavor, unbelievably filling and kid approved, this colorful mason jar salad recipe is jam-packed with fresh veggies, fruits, good fats and quality protein.
Ingredients
- Base Salad Blend
3 medium bell peppers (multiple colors including red, orange, yellow and/or green), cored, sliced and chopped into bite-sized pieces
1 medium red onion, sliced and chopped or diced
1 medium cucumber with skin, seeded,* sliced and chopped into bite-sized cubes
1 large head broccoli or 3 1/2 cups florets, stems and leaves removed, chopped into bite-sized pieces
2 medium carrots, grated or shredded**
1 Granny Smith apple, cored, sliced and chopped into bite-sized cubes
2 Fuji apples, cored, sliced and chopped into bite-sized cubes
2 avocados, peeled, pitted and chopped into bite-sized cubes
1 cup Gorgonzola or blue cheese crumbles (optional)***
4 large hard-boiled eggs (see recipe, optional)
4 cups ditalini pasta (rotini or fusilli work too), cooked al dente (optional)****
8 strips of bacon, pan-fried or oven-baked, sliced and chopped into tiny bits (see recipe, optional)
1 pound shrimp, peeled and deveined (optional)*****
1/2 teaspoon OLD BAY® seasoning (or your favorite seafood seasoning, optional)
- Honey Mustard Dressing (Optional)
1/2 cup plain full-fat (4-5% fat) Greek-style yogurt
1/4 cup extra-virgin olive oil
3-4 tablespoons French or Dijon style grainy mustard
4 tablespoons pure, raw and unfiltered honey
3 tablespoons raw, unfiltered apple cider vinegar
1-2 cloves fresh garlic, minced
Salt and freshly ground pepper, to taste
Directions
- Get Cooking and Chopping
- In a large pot, bring water to a boil, add the pasta and cook it until al dente according to the packet instructions.
- When you’ve reached the point of al dente, drain the pasta in a colander and then run it under cold water to stop the noodles from cooking. Once drained, transfer the pasta to a bowl and let it chill in the fridge until you’re ready to build the salad.
- Add OLD BAY® or seafood seasoning to a pot of water and bring it to a boil.
- Add the shrimp and cook them for 2-3 minutes or until pink and opaque. Transfer the shrimp to a bowl of cold tap water to stop the cooking process and allow them to cool.
- Drain the shrimp, pat them dry and set them aside until you’re ready to build the salad.
- Prep all the fresh veggie and fruit ingredients. We suggest chopping everything but the avocado in one take, as avocado tastes (and looks) better when it’s freshly cut.
- Prepare the Dressing
- Measure all the ingredients and add everything to your blender or food processor.
- With variable speed units, start with a low speed and then gradually increase it to a higher speed until the mixture is perfectly smooth.
- Transfer any leftover dressing to an airtight sealed container and store it in the fridge for up to 10 days (see recipe for more details).
- Pack Your Jar(s)
- Depending on your eating style you can use either 16-ounce or 32-ounce jars (see notes section for additional details).
- Once you’ve chosen your jar size, clean your jar(s) and add ingredients layer by layer (from the bottom to the top).
- Layer 1: Honey mustard dressing or your own.
- Layer 2: Cucumbers, peppers and onion.
- Layer 3: Broccoli, carrot, apples and pasta.
- Layer 4: Egg, shrimp (or chicken), cheese and bacon. Add these ingredients only if you’re eating your salad the same day you make it, or even the following day. Otherwise, we suggest saving them all until the day you’re actually planning to eat.
- Layer 5: Avocado. Chop up and add ONLY if you’re eating your salad the same day. Otherwise, we suggest chopping and adding it on the day you’re actually planning to eat.
- Seal and store jar(s) in the fridge until you’re ready to eat. When it’s time to eat, open and shake everything out into a bowl or onto a plate and mix the ingredients around with a fork to get a nice even distribution of dressing on the salad.
Notes
- *Scrape out cucumber seeds to avoid watering down the salad.
- **Whether you use Gorgonzola or blue cheese, both bring rich, earthy flavor and a good dose of pure protein to the bowl. Gorgonzola has a milder taste and softer texture than blue cheese which tends to be harder and crumblier.
- ***We suggest grating or shredding the carrots. You can do this with either a flat or box grater, or a food processor. You can also use the matchstick carrots sold prepackaged at your local grocery store.
- ****If you’re watching your weight or carbohydrate intake, consider trying a low-carb ditalini, rotini or fusilli.
- *****You can either use 31-40 count shrimp (since they’re already bite-sized), or larger shrimp and cut them into bite-sized pieces. If convenience is an issue, you can use precooked shrimp. If you’re allergic to shellfish chicken breast works too. Chopping up or shredding the breasts of a precooked rotisserie chicken can be delicious, cost-effective and time efficient.
- Leafy greens like kale, spinach and traditional salad greens make great additions to the blend. Add them as fifth-layer ingredients on the day you’re planning to eat, as they tend to get soggy when stored.
- All put together, the recipe is large enough to fill up to 10 standard 16-ounce jars. Depending on your eating style you can use either 16-ounce or 32-ounce jars. With proper layering and storage, it’ll keep in the fridge for up to five days. Just make sure your lids are always kept tightly sealed.
This information is provided as a courtesy and is only an estimate. Please review our full disclaimer to get a clear understanding of the nutrition and health information and resources presented and written on our website.


Lover your salad recipe, I trying to loose weight. With plant based and fish diet.
Thank you so very much and awesome Royston! Best of luck on your weight loss journey 😊